SpanoonapS
Bluelighter
"Grateful" isn't a big enough word. You guys are so helpful and cool. Thank you so much.
I will be around posting more ridiculousness
I will be around posting more ridiculousness


If you think transplant shock doesn't exist, you're sorely mistaken. I have witnessed it first hand, and while I don't claim that its really a huge issue, or something to worry about much, it is real and very much possible. It can manifest as lots of things: drooping and yellowing leaves, stunted growth, ect so its hard to diagnose and know what the real cause is, but if you encountered the problem after transplanting...seems logical. If you've ever had a plant shit out on you a few weeks after transplanting it, I guarantee it was directly attributed to your transplanting method. If it didn't exist, why would there be "About 342,000 results" for Cannabis transplant shock? Google it and read up about the subject.
Being pretentious about your growing methods is pretty fucking stupid, especially when mine are obviously better.
Aeration of the root ball can be done lightly by hand before transplanting into the medium, roots will grow in every direction man. Its not like they stay confined to their original shape. If you use proper additions (like perlite and cocoa) to your soil mixture that don't hold much moisture (or create humidity, like steer manure), it has no where to go but drain down, evaporate, or to be absorbed into the roots. You seem to have read a lot of books and know some fancy sounding shit, and while telling someone to read up is all fine and dandy, I'll stick to spending 300 days out of the year tending and caring for hundreds of REAL plants. If you told my grandpa to go read a book about growing weed, he'd mollywhop you right quick.
I'm not claiming to be growing the best weed ever or know the best techniques, but my accomplishments involving weed are more than enough for me to know I'm doing something right.
PS: This kind of shit is why I don't like growing indoor as much.
Being pretentious about your growing methods is pretty fucking stupid, especially when mine are obviously better.")
but my accomplishments involving weed are more than enough for me to know I'm doing something right.

Any time you have a soil that has as its primary fraction, peat, coir, compost, or other fine ingredients, it is inherently very water retentive and it absolutely will support a considerable volume of perched water. You can apply some 'tricks' to help you remove it, but its tendency is to remain very soggy. Adding other fine ingredients to this soil, like sand or topsoil, is a step backward. Adding more peat is a lateral move, having little affect on drainage/aeration and actually reducing those properties if it increases the % of small particles in the soil. Adding perlite simply reduces the o/a volume of water the soil is capable of holding.
Because soils like Fox Farm OC etc. use peat moss and other similar components as their primary fraction, you can draw the conclusion that they will hold a LOT of water - more than is necessary and more than wanted for good root health. When working with heavy soils, you either need to water in small sips, which ensures that the solubles from fertilizers and tap water will build up in the soil, or you take a chance & water correctly, flushing the soil of these salts when you water , but that may cause the soil to remain saturated too long and raise the issue of root rot. Whenever you choose a heavy soil, it always comes with a dilemma re how to approach watering.
OTOH, soils that have larger particulates as their base allow you to water freely and properly without concern for root rot. The added aeration and drainage, as well as the reduced ht of the perched water table make roots very happy. You might put a little more effort into making or finding a soil like I described, but the rewards are much less work 'fixing ills' down the road and the opportunity for much healthier and happy plants.
When it comes to container soils, THE most important thing is their structure and how long that can/will retain that structure. Peaty or compost-based soils are water-retentive from the outset, and collapse quickly after we plant in them. Adding sand or topsoil to them simply increases the amount of compaction and robs the soil of it's air.
A given volume of large soil particles has less overall surface area when compared to the same volume of small particles and therefore less overall adhesive attraction to water. So, in soils with large particles, gravitational flow potential (GFP) more readily overcomes capillary attraction. They simply drain better and hold more air. We all know this, but the reason, often unclear, is that the height of the perched water table (PWT) is lower in coarse soils than in fine soils. The key to good drainage is size and uniformity of soil particles. Mixing large particles with small is often very ineffective because the smaller particles fit between the large, increasing surface area which increases the capillary attraction and thus the water holding potential. An illustrative question: How much perlite do we need to add to pudding to make it drain well?
I already stated I hold as true that the grower's soil choice when establishing a planting for the long term is the most important decision he/she will make. There is no question that the roots are the heart of the plant, and plant vitality is inextricably linked in a hard lock-up with root vitality. In order to get the best from your plants, you absolutely must have happy roots.
If you start with a water-retentive medium, you cannot improve it's aeration or drainage characteristics by adding larger particulates. Sand, perlite, Turface, calcined DE ...... none of them will work. To visualize why sand and perlite can't change drainage/aeration, think of how well a pot full of BBs would drain (perlite), then think of how poorly a pot full of pudding would drain (bagged soil). Even mixing the pudding and perlite/BBs together 1:1 in a third pot yields a mix that retains the drainage characteristics and PWT height of the pudding. It's only after the perlite become the largest fraction of the mix (60-75% ) that drainage & PWT height begins to improve. At that point, you're growing in perlite amended with a little potting soil.
You cannot add coarse material to fine material and improve drainage or the ht of the PWT. Use the same example as above & replace the pudding with play sand or peat moss or a peat-based potting soil - same results. The benefit in adding perlite to heavy soils doesn't come from the fact that they drain better. The fine peat or pudding particles simply 'fill in' around the perlite, so drainage & the ht of the PWT remains the same. All perlite does in heavy soils is occupy space that would otherwise be full of water. Perlite simply reduces the amount of water a soil is capable of holding because it is not internally porous. IOW - all it does is take up space. That can be a considerable benefit, but it makes more sense to approach the problem from an angle that also allows us to increase the aeration AND durability of the soil. That is where Pine bark comes in, and I will get to that soon.
If you want to profit from a soil that offers superior drainage and aeration, you need to start with an ingredient as the basis for your soils that already HAVE those properties, by ensuring that the soil is primarily comprised of particles much larger than those in peat/compost/coir.sand/topsoil, which is why the recipes I suggest as starting points all direct readers to START with the foremost fraction of the soil being large particles, to ensure excellent aeration. From there, if you choose, you can add an appropriate volume of finer particles to increase water retention. You do not have that option with a soil that is already extremely water-retentive right out of the bag.
I fully understand that many are happy with the results they get when using commercially prepared soils, and I'm not trying to get anyone to change anything. My intent is to make sure that those who are having trouble with issues related to soil, understand why the issues occur, that there are options, and what they are.
We have seen that adding a coarse drainage layer at the container bottom does not improve drainage. It does though, reduce the volume of soil required to fill a container, making the container lighter. When we employ a drainage layer in an attempt to improve drainage, what we are actually doing is moving the level of the PWT higher in the pot. This simply reduces the volume of soil available for roots to colonize. Containers with uniform soil particle size from top of container to bottom will yield better and more uniform drainage and have a lower PWT than containers using the same soil with added drainage layers.
The coarser the drainage layer, the more detrimental to drainage it is because water is more (for lack of a better scientific word) reluctant to make the downward transition because the capillary pull of the soil above the drainage layer is stronger than the GFP. The reason for this is there is far more surface area on soil particles for water to be attracted to in the soil above the drainage layer than there is in the drainage layer, so the water perches. I know this goes against what most have thought to be true, but the principle is scientifically sound, and experiments have shown it as so. Many nurserymen employ the pot-in-pot or the pot-in-trench method of growing to capitalize on the science.
If you discover you need to increase drainage, you can simply insert an absorbent wick into a drainage hole & allow it to extend from the saturated soil in the container to a few inches below the bottom of the pot, or allow it to contact soil below the container where the earth acts as a giant wick and will absorb all or most of the perched water in the container, in most cases. Eliminating the PWT has much the same effect as providing your plants much more soil to grow in, as well as allowing more, much needed air in the root zone.
In simple terms: Plants that expire because of drainage problems either die of thirst because the roots have rotted and can no longer take up water, or they suffer/die because there is insufficient air at the root zone to insure normal root function, so water/nutrient uptake and root metabolism become seriously impaired.
To confirm the existence of the PWT and how effective a wick is at removing it, try this experiment: Fill a soft drink cup nearly full of garden soil. Add enough water to fill to the top, being sure all soil is saturated. Punch a drain hole in the bottom of the cup and allow the water to drain. When drainage has stopped, insert a wick into the drain hole . Take note of how much additional water drains. Even touching the soil with a toothpick through the drain hole will cause substantial additional water to drain. The water that drains is water that occupied the PWT. A greatly simplified explanation of what occurs is: The wick or toothpick "fools" the water into thinking the pot is deeper than it is, so water begins to move downward seeking the "new" bottom of the pot, pulling the rest of the water in the PWT along with it. If there is interest, there are other simple and interesting experiments you can perform to confirm the existence of a PWT in container soils. I can expand later in the thread.
I always remain cognizant of these physical principles whenever I build a soil. I have not used a commercially prepared soil in many years, preferring to build a soil or amend one of my 2 basic mixes to suit individual plantings. I keep many ingredients at the ready for building soils, but the basic building process usually starts with conifer bark and perlite. Sphagnum peat plays a secondary role in my container soils because it breaks down too quickly to suit me, and when it does, it impedes drainage and reduces aeration. Size matters. Partially composted conifer bark fines (pine is easiest to find and least expensive) works best in the following recipes, followed by uncomposted bark in the < 3/8" range.
Bark fines of pine, fir or hemlock, are excellent as the primary component of your soils. The lignin contained in bark keeps it rigid and the rigidity provides air-holding pockets in the root zone far longer than peat or compost mixes that too quickly break down to a soup-like consistency. Conifer bark also contains suberin, a lipid sometimes referred to as nature's preservative. Suberin, more scarce as a presence in sapwood products and hardwood bark, dramatically slows the decomposition of conifer bark-based soils. It contains highly varied hydrocarbon chains and the microorganisms that turn peat to soup have great difficulty cleaving these chains - it retains its structure.
Note that there is no sand or compost in the soils I use. Sand, as most of you think of it, can improve drainage in some cases, but it reduces aeration by filling valuable macro-pores in soils. Unless sand particle size is fairly uniform and/or larger than about BB size, I leave it out of soils. Compost is too fine and unstable for me to consider using in soils in any significant volume as well. The small amount of micro-nutrients it supplies can easily be delivered by one or more of a number of chemical or organic sources that do not detract from drainage/aeration.
")


Yeah I didnt have a job at the time. So you could imagine I was getting through a few bongs each day, and the odd joint too.Keep us updated when you do
edit: wait, what? 2-3g/day? That's a lot to get through! That would probably last me a week!

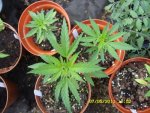
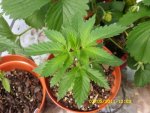
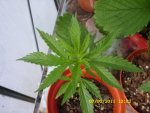
Hey guys, its been a while since i popped in, (AE, really digging your plants bro! They look awesome
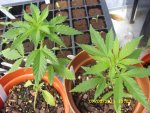
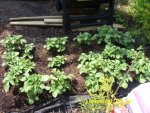
Just thought id show you's my new baby, although I'm not sure whether she's a she yet
I started growing it in a pot but transplanted when it was roughly 10-15cms tall. Ever since she has been in the ground shes grown so quickly..Haven't fed it any nutes, just watered once a day and 8 hours of sun.
NSFW:
NSFW:
Those two tents should be the right size for those three lights. As for blowing a fuse because you went over the switch limit, you are going to need to know which switch was blown (if not all of them). The AMPS are divided up amount those switches. Those switches are designated to a certain area of the house.Wattage and Lighting Questions Part 2.
I'm getting 2 Indoor Grow Tents - Dimensions are 56"length by 56"depth by 78"height
How many Ballast/Lights should be used for each tent. I was thinking 1 600w Metal Hallide for the veg and 2 400w HPS for the flower. (Looking to grow about 15 plants) 1 Digital Ballast for one room and 1 Digital Ballast for the other. You think that's enough?
Also - If I blow a fuse using too many AMPS, what should I do to get more juice? I have 125W max throughout the whole house.